Flask Blog tutorial with Hexagonal Architecture(part 2)
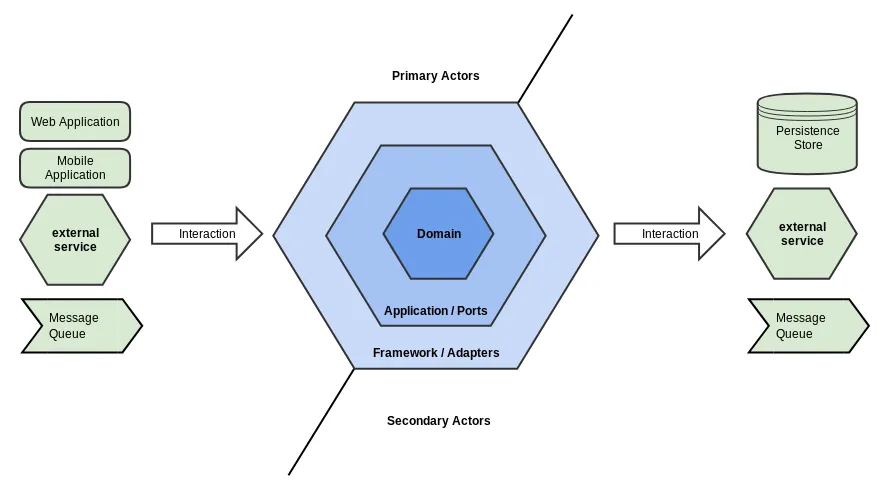
Photo from:
http://thinkmicroservices.com/blog/2019/hexagonal-architecture.html
In the first part of this series, we have launched the idea and initial code base for rewriting the original Flask Blog tutorial using Hexagonal Architecture.
This version of the tutorial is full of Dependency Inversion and Dependency Injection topics, so stay tuned, until you learn something new.
As we have concluded with the Ports part of the Ports and Adapters pattern(namely Hexagonal Architecture), it is time to implement the adapter's side. Please refer to the first part of the project folder structure.
We talked about Dependency Injection in-depth in the final third part of this series.
Repository pattern implementations
We are going to have two separate repositories, PostRepository and UserRepository both of them implements the RepositoryInterface from ports part.
Path: src/adapters/db/post_repository.py:
And src/adapters/db/user_repository.py:
Please notice that both repositories, accept database connection as a dependency, which will be injected by Dependency Injection later.
And again recalling the first part our PostService and UserService ports have a dependency of RepositoryInterface, and during Dependency Injection the concrete implementations PostRepository and UserRepository will be injected.
This is the so-called Dependency Inversion principle from SOLID in action.
The actual higher-level code(PostService and UserService) does not depend on low-level code(PostRepository and UserRepository), both depend on abstractions(interfaces).
Flask application
So far so good, we have a ports part and also the part of the adapter, now it is time to initialize our Web app.
Thinking about the Flask application, just imagine that the Flask is the trigger or initiator of our project. It is on the outside left of the Hexagon, and it triggers some actions.
Particularly, the endpoints are going to interact with our system via services — UserService and PostService.
For example, /auth/register should use user service to create functionality, etc.
And yes, the services are dependencies for our endpoints, therefore they will be injected by Dependency Injector.
Flask app structure
Our overall web app structure is:
All static and templates were grabbed from the Flask blog tutorial code base.
Let’s explore application.py:
For now, just ignore the Container() parts, as will be explained in the last part.
The registering blueprints are also should be familiar, but what is the init_app()? It is basically the flask CLI command for initializing the database, and it is located in main.config.
That leads us to the main configuration section of our project.
Configuration
In src/main/config.py we put all configs, which is a quite naive and proper way of centralizing our settings.
The init_app() registers init-db command (see the @click.command decorator) as a Flask CLI command.
There is a schema.sql file which is located in src/adapters/app/schema.sql which is going to be used in init_db(), to create database tables. As the init-db the command is part of the flask app command, the schema.sql is also located, nearby.
We are not using ORM here as the original Flask blog tutorial misses this topic.
Another interesting part is get_db() function, if you noticed we are returning the callable from this function, and the caller should call the returned value to get the actual DB connection.
This is a workaround for the Dependency Injector, as the connection object itself can not be pickled.
Flask blueprints
Now we are getting closer to the actual web app.
Let’s define our blueprints, in src/adapters/app/blueprints. Basically, we have two files auth.py for authentication endpoints, and blog.py for blogging:
auth.py:
The logout function and login_required decorator are straightforward and require no attention.
The rest is quite interesting. The register signature is:
Notice that, the user_service is a dependency for this function and the actual user_service the object is provided by the Dependency Injector Container(Provide[Container.user_package.user_service]).
The @inject decorator indicates that the user_service is going to be injected, provided.
We will explore the Dependency Injection topic in third part, so please do not panic.
Let’s explain a bit the code portion below:
register_user_factory accepts user_name and password and returns the RegisterUserInputDto as we have explained, in the first part of this article series.
Notice that password hashing, and all other validation stuff is going to happen inside the factory. We have delegated this responsibility from endpoints and services to the Dto side.
After getting back the RegisterUserInputDto the object we send it directly to the user_service.create() method, which has the following signature:
It accepts the RegisterUserInputDto then creates an actual User model using user_factory.
Notice how the uuid4 generation is also hidden inside the user factory because it is not the responsibility of the service created.
The rest is easy, insert the User into the User database table and return it back.
The same principles and ideas are valid for the blog blueprint.
Let’s explore it in detail, blog.py:
Create, Update and Delete endpoints accept PostService as a dependency from Dependency Injection Container. The again notable things we have separated create_post_factory, update_post_factory and delete_post_factory, for creating Dtos: CreatePostInputDto, UpdatePostInputDto and DeletePostInputDto.
Those Dtos are then passed to actual respective service actions.
In this second part we have explored:
- Repository pattern implementations
- Flask app starter code, database initialization
- Briefly introduced the Dependency Injection Container ideas
- Implemented the web endpoints, with Flask blueprints